Game of Life in Swift Playgrounds - Part 2

If you haven't already, you'll want to check out part 1 before continuing with this chapter.
World
The World is where our cells will live out their entire lives. It’s also where we will set up most of the logic and rules for the game. So naturally, a few things might already be coming to mind with what properties we might need.
For starters, we’ll need somewhere to store our cells, and we’ll also need to know how many cells are required to fill the world.
public class World {
    public var cells = [Cell]()
    public let size: Int
}
size will be the number of cells that can fit across both axis of the world grid. So a world with the size of 10 would be able to support one hundred cells.
Let’s write an initializer for our world class.
public init(size: Int) {
    self.size = size
}
This initializer gives us an excellent entry point into this class. Being able to specify a size at initialization is important because the next step is to fill the cells array with cells.
Still, inside the World initializer, add the following code.
for x in 0..<size {
    for y in 0..<size {
        let randomState = arc4random_uniform(3)
        let cell = Cell(x: x, y: y, state: randomState == 0 ? .alive : .dead)
        cells.append(cell)
    }
}
Here we have a 2D array. 2D arrays are used almost exclusively for building out a grid. You’ll find them in nearly every grid type tile game. x loop for one axis y loop for another. However, we’re using the results a little different than what would be considered conventional. The cells are being inserted directly into a list — a single array. This is because we’ve opted to have the cells know their position in the world, rather than having their position determined by where they might be in a nested array. The benefit here is that this will be the only place in our program that you’ll see a nested for loop. This gives our game a slight performance increase. So when it comes time to check the neighbors of a cell, or draw it to a view, we’ll only need to iterate over a single array.
I’ve opted to go for a random distribution of alive and dead cells in my world as I find that random world generation is much more interesting. In many versions of the Game of Life, players can set which cells they’d like to be alive, and sometimes even make changes after the game has started running.
In our version, about a third of the cells will be alive when the game starts. You can adjust this to your taste by changing the input integer for arc4random_uniform(). The higher the number, the less live cells will be created.
To test this out, we’ll go back to the main playground file, remove the code we have in there for testing `Cell` and replace it with this:
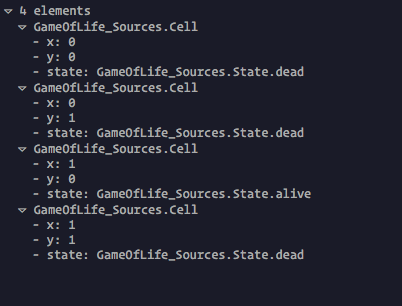
let world = World(size: 2)
dump(world.cells)
When it comes to things like arrays or nested object types, they can be difficult to read when their contents are printed out all on a single line. dump will output the contents of an object to the console in an excellently structured and readable way.A world with the size of 2 should print out four cells to the console.
World View
The WorldView.swift will be a class where we put our all of our drawing code. This will be a subclass of UIView and get passed into the liveViewproperty of our playground. Its also there look after our World object.
The first thing we need to do is import UIKit at the top of the file.
import UIKit

public class WorldView: UIView {
    var world: World = World(size: 100)
    var cellSize: Int = 10
}
The only two properties we’ll need is the world and cellSize. The cellSize is what we’ll use to draw each cell as well as calculate how big the view needs to be.
If each cell is 10x10 pixels, and the world is a size of 5, then the view would need to draw its cells on a square canvas of 50x50 pixels.
Notice that while the class has been made public, these two properties are private. We won’t need to access them outside of this class, but we will need a way to set them. Unfortunately, since we’re using a subclass of UIView, we must make use of its designated initializers. To do this, we’ll create our own convenience initializer to pass in a few parameters which will then call a designated one.
public convenience init(worldSize: Int, cellSize: Int) {
    let frame = CGRect(x: 0, y: 0, width: worldSize * cellSize, height: worldSize * cellSize)
    self.init(frame: frame)
    self.world = World(size: worldSize)
    self.cellSize = cellSize
}
Here we’re calculating the size of the canvas based on the worldSize and cellSize parameters, then creating a frame which gets passed into the views init function.
Since we also have world and cellSize initialized in their property declarations, we may as well use these as a default for setting up WorldView. So let’s create another convenience initializer for that too.
public convenience init() {
    let frame = CGRect(x: 0, y: 0, width: 1000, height: 1000)
    self.init(frame: frame)
}
Now we have a few errors. UIView has a required init function that we must implement whenever we subclass it. Even though we won’t be using it, we still need to have it in there.

You can get Xcode to stub this out for you, but if that doesn’t work, use the following code:
public required init?(coder aDecoder: NSCoder) {
    fatalError("Not implemented")
}
We want the program to crash if something tries to initialize WorldView with this function. Crashing is a great way to inform ourselves and future developers that nothing is supposed to call this function. The program will exit early, and we’ll get a little error message in the console.
To fix the last compilation error, we also need to add the init(frame:)function that one of our convenience initializers are calling.
public override init(frame: CGRect) {
    super.init(frame: frame)
}
Finally, let’s start drawing some cells.
We’re going to override UIViews draw function.
public override func draw(_ rect: CGRect) {
}
The default implementation of this method doesn’t do anything, so there’s no need to call super as we do with the init functions. We also never need to call this method directly. iOS will call draw(rect:) when the view is first displayed, or any time an event occurs that invalidates a visible part of the view. Later on, we’ll force a drawing update indirectly by calling setNeedsDisplay any time a touch is detected.
It’s important to remember that this function should only be responsible for rendering view content. Any other code you put in here that might take a significant amount of time to execute will impact the performance of your application. I highly encourage you to have a read through of Apple’s documentation on draw(rect:).
Inside the draw method, we’ll grab a reference to the CGContext provided by Core Graphics.
let context = UIGraphicsGetCurrentContext()
context?.saveGState()
We’ll be passing messages to this context; telling it what to draw for every cell that exists in the world.
for cell in world.cells {
  let rect = CGRect(x: cell.x * cellSize, y: cell.y * cellSize, width: cellSize, height: cellSize)
	let color = cell.state == .alive ? UIColor.green.cgColor : UIColor.white.cgColor
	context?.addRect(rect)
	context?.setFillColor(color)
	context?.fill(rect)
}
So the position of each cell is based on the product of its coordinates and cellSize. This places them at regular intervals within the view. I’ve also set the color of my live cells to green, but you’re free to set any color here.
Then, at the end of the draw method, we’ll set our changes so that they can appear in the view.
context?.restoreGState()Let’s test this out and get some cells appearing in our playgrounds live view!
Go back to you main playgrounds file and replace the code from our previous test with these two lines:
let view = WorldView(worldSize: 10, cellSize: 10)
PlaygroundPage.current.liveView = view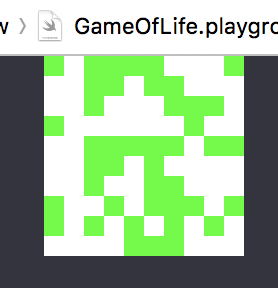
Run the playground, and you should see live and dead cells randomly distributed in a 10x10 grid.
In part 3 we’ll go over creating the game rules.